Welding defects are problems or mistakes in a weld that do not follow the rules set by groups like AWS, ASME, or ISO. There are various types of welding defects, including porosity, lack of fusion, and cracking. These defects often occur due to poor welding techniques or improper joint preparation. Welding defects weaken the weld and reduce its strength, which can also shorten the lifespan of the weld. Understanding the different types of welding defects helps workers maintain high-quality welds, prevent premature failure, and ensure the safety of structures and equipment.
Key Takeaways
- Welding defects make welds weak and unsafe. Knowing the types helps keep welds strong and safe.
- Defects are in three groups: external (you can see them), internal (you cannot see them), and dimensional (problems with shape or size).
- Some common defects are cracks, porosity, undercut, overlap, and lack of fusion. Each one happens because of certain welding mistakes or conditions.
- Visual inspection finds surface defects early. Special tests like X-rays and ultrasonic find hidden problems.
- Good preparation, correct welding settings, clean materials, and skilled welders stop most defects. This saves time and money.
Classification of Welding Defects
Welding workers sort defects into three big groups: external defects, internal defects, and dimensional defects. This sorting helps people find out where and what kind of problem is in the weld. When teams know the types of welding defects, they can pick the best way to check for problems and fix them.
External Defects
External defects show up on the outside of the weld. You can usually see these flaws without any special tools. Some common welding defects here are cracks, undercut, overlap, porosity, and spatter. These problems often happen because of bad welding skills, wrong settings, or dirty materials.
- Cracks: Straight breaks on the weld surface that make it weaker.
- Undercut: Grooves at the edge of the weld that lower strength.
- Overlap: Extra weld metal that does not join right.
- Porosity: Tiny holes or gas bubbles on the outside.
- Spatter: Small metal drops around the weld.
Tip: Checking the weld by looking at it often helps find outside defects early and saves money on repairs.
Internal Defects
Internal defects are under the weld surface. You cannot see these flaws unless you use special tests like ultrasonic or X-ray. Internal defects can make welded things less strong and less safe. The most common welding defects here are internal cracks, slag inclusions, porosity, and lack of fusion.
| Internal Defect | Description |
| Cracks | Breaks inside the weld that can get bigger |
| Porosity | Gas bubbles stuck inside the weld |
| Slag Inclusions | Non-metal stuff inside the weld |
| Lack of Fusion | Weld and base metal do not join all the way |
Dimensional Defects
Dimensional defects change the shape, size, or fit of welded parts. These problems can make it hard to put things together or use them. Distortion, misalignment, and underfill are some examples. These defects often happen when the heat is not even or welding settings are not right.
- Distortion: Shape changes that make building things hard.
- Misalignment: Parts do not match up as they should.
- Underfill: Weld bead does not fill the space all the way.
Sorting the types of welding defects helps welders pick the right way to check and fix problems. This makes sure welds are strong and safe for any job.
Types of Welding Defects
Welding workers find many problems when making things. This section talks about the most common welding defects. It explains what they look like, why they happen, and how to fix them.
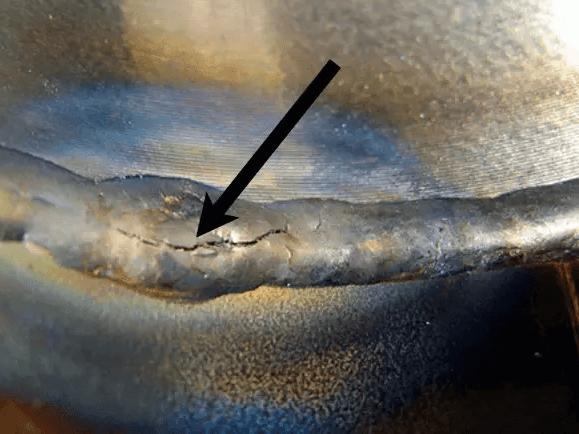
Cracks
Cracks are the worst kind of welding defect. They can be on the outside or inside the weld. Cracks often make the weld break when it is under pressure.
| Crack Type | Appearance & Location | Causes & Notes | |
| Crater Crack | Shallow, star-shaped at weld end | Hot cracks from improper arc stop, metals that expand a lot | |
| Face Crack | Long cracks on the weld surface | Too much curve, cools too fast, welding too quickly | |
| HAZ/Underbead Crack |
|
Cold cracks from hydrogen, metal not stretchy, high stress | |
| Longitudinal Crack | Along the weld, in the middle or ends | Weld held too tight, shrinking, trapped bubbles or slag | |
| Root Crack |
|
Weld does not go deep enough, moves too fast, dirty, wrong materials | |
| Throat Crack | From weld face to root | Hot cracks, cracks along the weld | |
| Toe Crack |
|
Cold cracks, shrinking, tired metal, welding over coatings | |
| Transverse Crack | Across the weld | Shrinking along the weld, hydrogen makes metal weak, held too tight |
Cracks happen when stress is too high for the weld or metal. Hydrogen, fast cooling, and bad welding steps cause cracks often.
Prevention and Repair:
- Pick metals and fillers that work well together.
- Keep things dry and clean to stop hydrogen.
- Heat before and after welding to control temperature.
- Get joints ready and avoid stopping and starting too much.
- Use good welding steps and trained welders.
- Check welds by looking and with special tests to find cracks early.
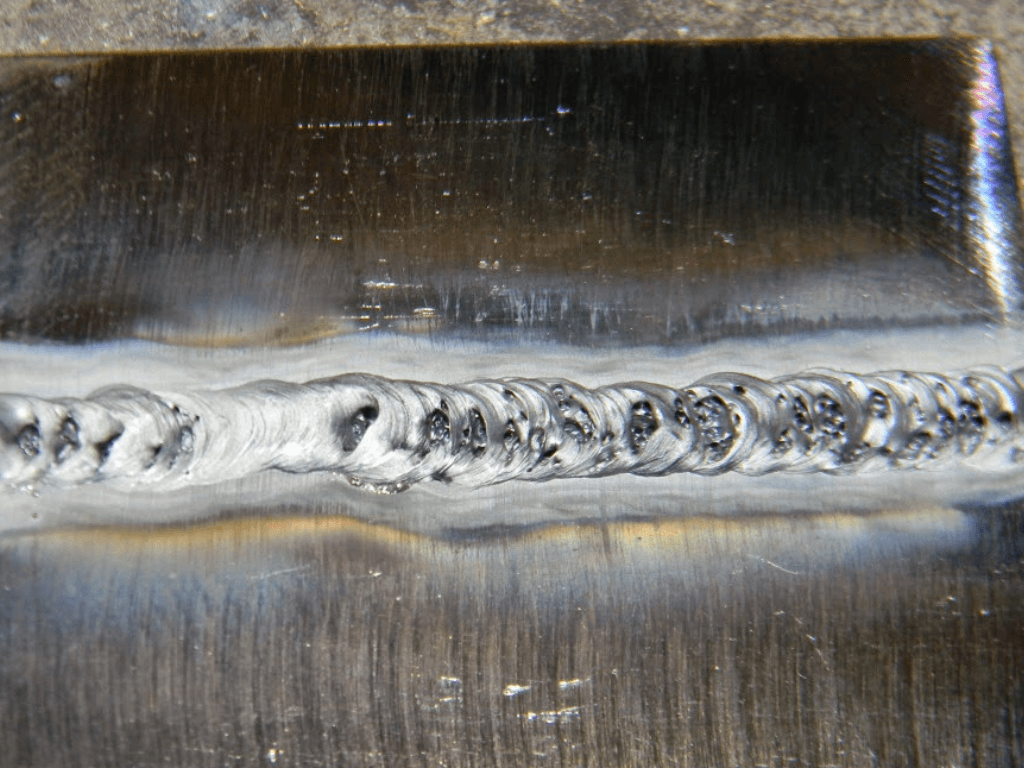
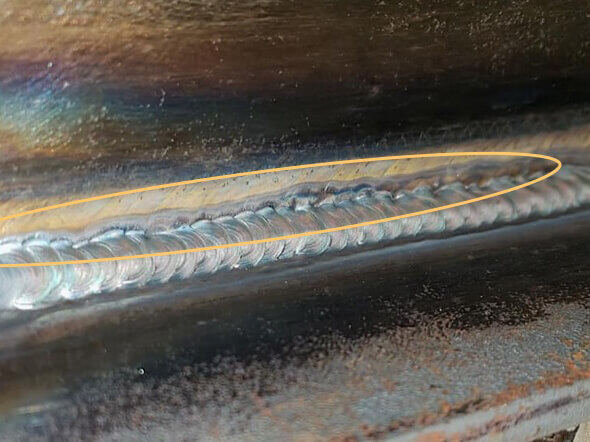
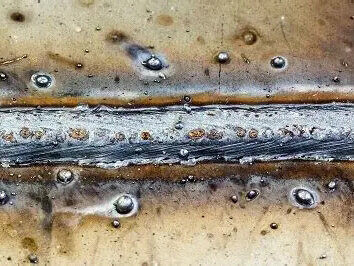
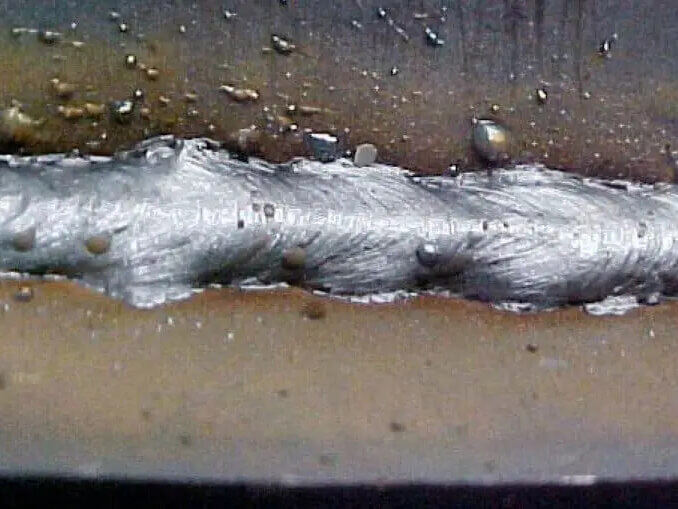
Porosity
Porosity means gas bubbles get stuck in the weld. These bubbles make holes that weaken the weld.
- Appearance: Small holes or spaces in or on the weld.
- Causes:
- Hydrogen from wetness or rust.
- Oil, grease, paint, or exhaust on metal or wire.
- Not enough shielding gas because of wind, nozzle problems, or wrong flow.
- Dirty metal like rust or wetness.
- Prevention:
- Clean metal and wire well.
- Store things in dry, clean places.
- Use pure shielding gas and set flow right.
- Do not weld where it is windy and clean nozzles often.
Undercut
Undercut is a groove or notch at the weld edge. It makes the weld weaker.
| Aspect | Description |
| Manifestation | Groove at weld edge, next to bead, deeper than 0.5 mm |
| Common Causes | Too much current, welding too fast, wrong torch angle, long arc |
| Effect | Bad join between weld and metal, groove forms |
Prevention and Repair:
- Use the right current and keep arc short.
- Match wire speed with current.
- Hold torch at the right angle.
- Grind and fix undercut spots if needed.
- Teach welders better skills.
Spatter
Spatter means tiny drops of melted metal land around the weld.
Main Causes:
- Wrong voltage or amperage.
- Bad wire speed.
- Poor shielding gas
- Dirty metal.
- Wrong electrode angle.
- Uneven welding speed.
- Bad welding technique.
- Broken equipment.
- Wrong stick-out length.
- Bad materials.
Reduction Techniques:
- Set equipment for a steady arc.
- Use the right shielding gas and flow.
- Clean metal before welding.
- Hold electrode at the right angle and speed.
- Use good hand skills.
- Spray anti-spatter spray.
- Take care of equipment often.
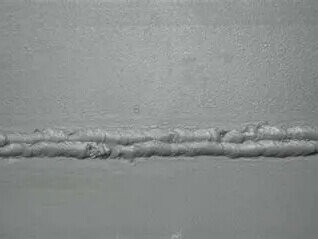
Overlap
Overlap, or cold lapping, happens when weld metal sits on top of base metal but does not join.
Appearance: Weld metal goes past the edge, causing stress.
Causes: Uneven electrode work, wrong welding settings, happens in blind joints.
Prevention:
- Make a smooth change at the weld edge.
- Move electrode evenly between metals.
- Change speed and voltage for good join.
- Keep electrode angle and speed correct.
Lack of Fusion
Lack of fusion is when weld metal does not stick to base metal or earlier weld.
Appearance: You see a gap or poor join at the weld edge.
Contributing Factors:
- Not enough heat (current, voltage, speed).
- Bad joint prep and design.
- Not enough shielding gas.
- Mistakes by the welder.
- Bad conditions and poor equipment care.
Prevention:
- Set welding for enough heat.
- Get joints ready and shaped right.
- Take care of equipment and watch conditions.
- Use the right shielding gas and flow.
- Train welders and check quality.
Incomplete Side Wall Fusion
Incomplete side wall fusion means weld metal does not join the sides of the joint.
- Appearance: Unjoined spots along the joint sides.
- Causes: Bad welding, wrong joint shape, wrong welding settings.
Prevention:
- Use enough heat and right settings.
- Make joints easy to reach and join.
- Teach welders good skills.
Slag Inclusions
Slag inclusions are bits of non-metal stuff stuck in the weld, often from flux.
- Appearance: Odd, dark lines or pockets inside the weld.
Primary Causes:
- Flux that does not clean well.
- Wrong welding settings (low power, wrong speed).
- Bad technique (wrong electrode size or angle).
- Dirty or rough metal.
Prevention:
- Clean and grind metal smooth.
- Remove slag between welds.
- Set welding for best results.
- Use the right electrode size and angle.
- Do not weave in ways that trap slag.
Lack of Penetration
Lack of penetration means the weld does not go all the way through the joint.
- Appearance: You see gaps in cross-section or with tests.
- Effects: Makes the weld weak and easy to break.
- Causes: Bad control of current, voltage, and speed.
Inspection Methods:
- Look at the weld surface.
- Use X-rays for inside.
- Use sound waves for hidden problems.
- Use dye or magnets for surface flaws.
- Break weld to check strength.
Finding lack of penetration early saves money and keeps things safe.
Under-fill
Under-fill is when the weld bead does not fill the joint space.
Appearance: Weld looks sunken or not enough material.
Operational Mistakes:
- Too much power or voltage.
- Wrong electrode size or angle.
- Bad technique and speed.
- Wrong shielding gas.
- Bad joint fit and prep.
- Poor machine setup or care.
Correction:
- Follow good welding steps.
- Pick the right electrode and gas.
- Hold at the right angle and arc length.
- Train welders and prep joints well.
- Keep equipment in good shape.
Excess Reinforcement
Excess reinforcement is when too much weld metal makes the joint thick.
Consequences:
- Stress builds up at the weld.
- More chance of breaking or bending.
- Lower strength and more rust risk.
- Shorter life for pipes and tanks.
Prevention:
- Use good welding and right power.
- Control how many weld passes.
- Follow rules for weld thickness.
- Look at welds and grind off extra metal.
Excess Penetration
Excess penetration is when weld metal sticks out too much at the joint root.
Risks:
- Sharp spots and stress build-up.
- Rust, wear, and flow problems in pipes.
- More cost and less work speed from grinding.
Causes:
- Big joint gap, not enough root face, too much heat.
- Slow electrode moves, high power.
- Control Measures:
- Fit joints as rules say.
- Move electrode at the right speed.
- Use the right power.
- Teach welders if they make too much penetration.
Summary Table: Most Prevalent Types of Welding Defects
| Defect Type | Description | Examples / Subtypes | Notes on Prevalence and Impact | |
| External Defects | Problems you can see on the weld surface |
|
Cracks are the worst; porosity and undercut happen a lot; misalignment makes welds weaker. | |
| Internal Defects | Problems you cannot see without tests | Slag inclusion, Incomplete fusion, Incomplete penetration | These make welds weak and unsafe, found by special tests. | |
| Other Specific Defects | Problems from special welding methods | Whiskers (MIG welding), Necklace cracking (electron beam welding) | Not common but important for some jobs. |
Knowing about welding defects and what causes them helps welders and inspectors keep welds safe and strong.
Identifying and Detecting Defects
Visual Inspection
Visual inspection is the first and cheapest way to find welding defects. Inspectors use their eyes and simple tools to check welds before, during, and after making them. They look for surface problems like cracks, undercuts, porosity, and incomplete welds. Finding these problems early stops costly repairs and makes sure welds are good quality.
Inspectors use a few main ways to check:
- Direct Visual Inspection (DVI): This uses just your eyes and simple tools like flashlights, mirrors, and magnifiers. It helps spot defects you can see right away. You do not need much equipment for this.
- Remote Visual Inspection (RVI): This uses special tools like borescopes and drones. It helps check places that are hard or dangerous to reach. This keeps people safe and lets them look more closely.
- Automated Visual Inspection (AVI): This uses computers and cameras to check welds fast and the same way every time. It helps stop mistakes and makes checking quicker.
Common tools are magnifying glasses, weld size gauges, straight edges, and borescopes. Inspectors check materials and joints before welding. They watch weld beads as they are made. They also do a last check to find surface problems and size mistakes. Visual inspection is good for surface defects but cannot find hidden problems inside the weld.
Tip: Visual inspection is a good first step to check weld quality. If needed, it can lead to more tests.
Non-Destructive Testing
Non-destructive testing (NDT) helps inspectors find inside and outside defects without hurting the weld. These tests use special machines to find problems that eyes cannot see. Each test works best for certain defects and materials.
| NDT Technique | Applicability / Notes | Detection Limits / Defect Size (µm) | Additional Details |
| Eddy Current Testing (ET) | Works on metals that carry electricity; finds small, shallow problems; can be real-time | Finds small defects | Cannot check deep problems; can watch in real time for metals |
| Ultrasonic Testing (UT) | Finds deep inside problems in metals and plastics; needs contact | Finds deeper defects | Laser ultrasonic can check during welding without touching |
| Radiography | Shows many inside problems; misses very tiny ones; not real-time | May miss very fine defects | Computers can spot burn through, lack of fusion, penetration, slag; slow for real-time use |
| Liquid Penetrant Testing | Surface test; glowing dye shows cracks on the surface | >750 µm | Does not work for inside problems; only for surface flaws |
| Thermography (IR) | Finds problems in real time with IR cameras and computers | Not clearly stated | Laser thermography checks during welding; special IR cameras are best for machines |
| Voltage and Current Monitoring | Watches welding settings in real time; uses math or computers | No set defect size | Good for finding problems while welding; needs data sorting and checking |
Inspectors pick the best test based on the weld, material, and where the problem might be. Visual inspection is best for surface problems. NDT tests help find hidden problems and make sure welds are strong.
Prevention and Repair
Best Practices
Welders use smart ways to stop defects and keep welds strong. They get ready, use good skills, and check their work. The table below shows how to stop common welding defects:
| Welding Defect | Prevention Strategies |
| Porosity | Clean parts, control gas, stop wind, use hydrogen removers in filler metals |
| Distortion | Preheat metal, weld in steps, design joints well, use flexible clamps, use less heat |
| Spatter | Set current and voltage right, use good gas, clean metal, weld steady, use anti-spatter spray |
| Incomplete Penetration | Design joints well, use right settings, pick good electrode, clean well, preheat if needed |
| Undercut | Use right settings, hold electrode right, use enough gas, clean joint, practice welding |
Welders clean surfaces by grinding off paint and rough spots. They drill holes at crack ends to stop cracks from growing. Good bead placement, short arc, and steady speed make welds strong. Controlling heat keeps the metal safe. Cooling slowly stops cracks and bending. Checking welds after with eyes or special tests makes sure they are good. Welders pick the right filler and treat welds after for strength. Keeping tools in shape and handling them right stops new problems. For hard fixes, welders ask experts for help.
Common Mistakes to Avoid
Quality checks show mistakes that cause welding defects. Sometimes welders use old tools, which break and make bad welds. Picking the wrong MIG gun size can make it too hot. Choosing cheap filler metals can cause spatter and feeding trouble. Not cleaning or fitting parts right makes more defects. Not heating metal enough can cause cracks. Using the wrong gas or flow hurts weld quality. Storing filler metals badly lets them get wet. Not changing MIG gun parts can cause bad gas flow. Skipping tool care leads to surprise breakdowns. Not training enough means welders have fewer skills.
Tip: Welders who use good habits and skip mistakes make safer, stronger welds. Training often and checking tools helps keep work great on every job.
Spotting and fixing welding defects keeps welds strong and safe. Checking welds often and taking care of tools finds hidden problems. This stops expensive repairs.
- Training and getting certified helps welders learn good skills. This means fewer mistakes and better welds.
- Good prevention plans make less waste, save money, and keep workers safe.
- When welders use smart steps and know the latest rules, they keep products working well and help them last longer.
FAQ
What is the most dangerous welding defect?
Cracks are the most dangerous defect. They make the weld weak. Cracks can break the weld fast. Welders need to fix cracks quickly. This keeps buildings and machines safe.
How can welders spot hidden welding defects?
Welders use special tests like ultrasonic testing or X-rays. These tests find inside defects. Visual checks cannot see these problems.
Why does porosity occur in welds?
Porosity happens when gas gets stuck in the weld pool. Dirty metal, wetness, or bad shielding gas cause this problem.
Can welders repair all types of welding defects?
| Defect Type | Repairable? |
| Cracks | Yes |
| Porosity | Yes |
| Slag Inclusion | Yes |
| Excess Penetration | Yes |
Most defects can be fixed. Sometimes welders must cut out the weld and do it again.